Introduction #
Most of you have noticed that you must develop in your VMs for CS 341. This requires editing and writing code within the VM, which is usually done via the vim text editor. Vim is a great tool, and we highly encourage you to at least pick up the basics of vim so that you can be comfortable using it throughout your careers as software engineers. Some good resources are https://learnvimscriptthehardway.stevelosh.com/, https://vim-adventures.com/, and, for those who just want a basic cheat sheet, https://vimsheet.com/.
All that said, we understand that it can be frustrating to use vim when you are working with large files and projects, and many of you would feel more comfortable using your traditional text editor of choice. We’ll provide a series of steps here that will help you set up a development environment that lets you edit your code locally in VS Code (you can modify this process to use Atom or Sublime) and run the code in the VM.
To be clear, you will not be running your code locally. You will be editing and running your code on your VM through ssh (e.g. make, make test, running binaries, etc). However, you will be able to do all of that in VS code, which is synced to the VM through ssh.
Steps #
-
Set up a VPN if you aren’t on IllinoisNet. This is essential if you want to develop outside of IllinoisNet’s network. Instructions for setting up a VPN are here.
- Open up a terminal or an ssh client (Putty, example) and ssh into your VM using the command:
ssh <netid>@<your vm address here>Ensure that this successfully logs you into your VM, and navigate to an assignment directory. If this doesn’t log in correctly, the following steps will not work. If you are unable to ssh into your VM, make a post on EdStem. You may also need to contact EngrIT.
-
Download and install VS code from this website.
- Install the Remote SSH Extention from Microsoft:

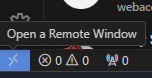
- Click the open remote window button at the bottom left of the editor:
-
Click “Connect to Host… Remote-SSH”, then “+ Add New SSH Host”
-
Enter the SSH Command shown above, then pick a configuration file to save it to.
-
You can then click the open remote button again, connect to remote ssh host, and pick the VM you just added. It will prompt you for a platform (use linux) and your netID password.
-
Now you have remote access to your VM! The integrated terminal and file editor will run and make changes on the VM itself, not on your local machine. You can clone your course repository to the VM (if you have not done so already), and open the folder in the editor (this may require you to enter your password again). Happy Programming!